The 30 Best Spring Nails Designs & Ideas in 2024
The frost of winter is melting away, and the blossoming season of spring beckons a fresh palette for your nails. Here you’ll find spring nail inspirations for 2024, offering a curated selection of the most vibrant, trendy, cute nail design inspos and step by step instructions on how to do them yourself.
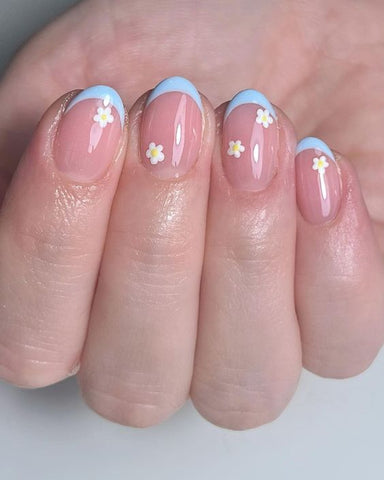
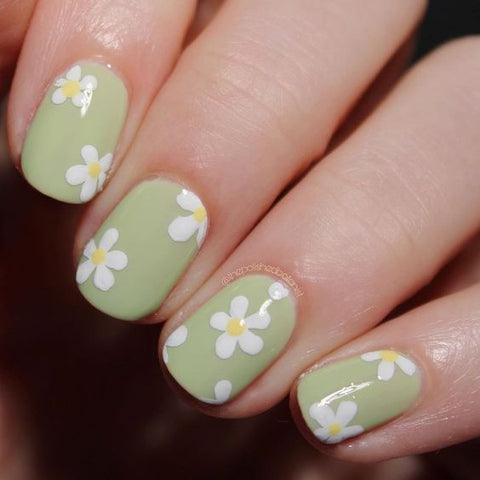
1. Baby Blue Petals

Achieve this look at home:
- Start with a translucent warm pink polish on all nails.
- For the floral nails, use a dotting tool to create small flowers with white petals and a yellow center on the thumb, middle, and pinky fingers.
- Paint the tips of the index and ring fingers with a sky blue polish for a French manicure effect.
- Use a thin brush to apply the white and yellow polishes for the floral details.
- Add a final touch by accentuating the blue tips with the thin brush for a clean line.
Nail colors used:
- Translucent warm polish
- White polish
- Yellow polish
- Sky blue polish


Supplies needed:
- Dotting tool
- Thin brush
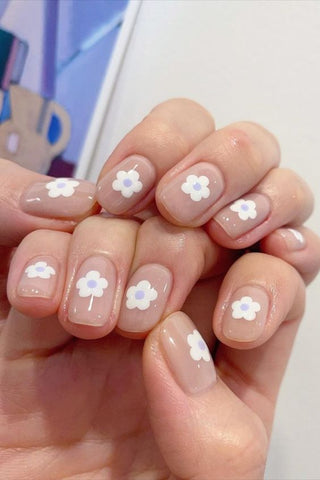
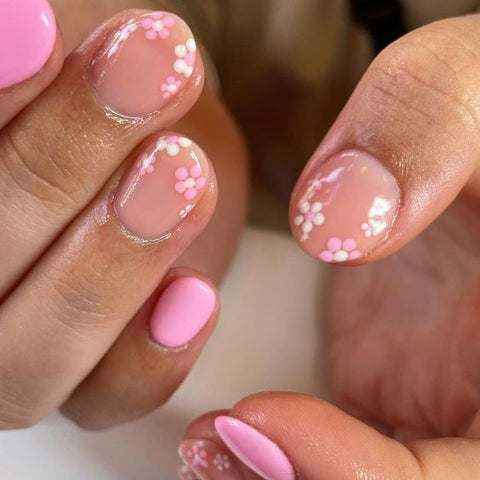
2. Blossoming Milky Way
@nylove_nail (Instagram)
On a canvas of clear base, whimsical flowers with pastel petals bloom along the tips, creating a garden of serenity at your fingertips.
Achieve this look at home:
- At the tips, paint small flowers with pastel pink, blue, and yellow polishes using a dotting tool or the tip of a toothpick.
- Add a tiny green dot in the center of each flower for a touch of detail.
- Use a fine brush to draw in delicate green leaves at the sides of each floral cluster.
- Allow each nail to tell its own story with the placement and combination of colors for the flowers.
Nail colors used:
- Pastel pink polish
- Pastel blue polish
- Pastel yellow polish
- Green polish


Supplies needed:
- Dotting tool or a toothpick
- Fine brush
3. Blue Heart Window
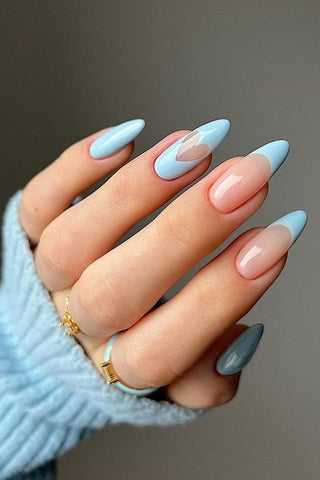
@thehotblend (Instagram)
The soft interplay of powdery blue and warm nude on these nails creates a serene and stylish gradient, complemented by a heartwarming touch of a heart on the accent nail.
Achieve this look at home:
- Start with a warm nude polish on all nails, leaving the ring fingers bare for now.
- Apply a powdery blue polish on the tips of the nude nails, blending slightly into the base color to create a soft gradient.
- On the ring fingers, use the blue polish as the base color.
- Once the blue base is dry, carefully paint a nude heart at the center using a fine brush for precision.
- Refine the edges of the heart and gradient with a fine brush to ensure a smooth transition between colors.
Nail colors used:
- Warm nude polish
- Powdery blue polish


Supplies needed:
- Fine brush
4. Blue Springtime Skies
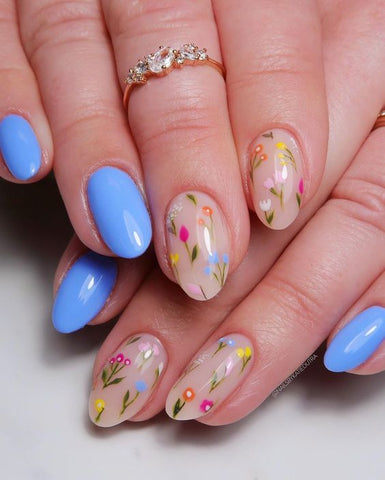
@nailsbykatiedutra (instagram)
This nail art blossoms with the freshness of spring, showcasing an elegant dance of wildflowers. Clear nails are adorned with delicate floral patterns while the solid blue nails offer a bold pop of color.
Achieve this look at home:
- Apply a clear base coat to all nails, leaving the thumb and pinky fingers bare for the blue polish.
- Paint the thumb and pinky nails with a sky blue polish for a vibrant contrast.
- On the clear-coated nails, use a fine brush to paint small stems and leaves with green polish.
- Add petals using pink, yellow, and white polish, creating various flower shapes on each nail.
- Finish with a top coat to protect the design and add a glossy sheen.
Nail colors used:
- Sky blue polish
- Green polish for stems/leaves
- Pink, yellow, and white polish for flowers


Supplies needed:
- Fine brush for detailed work
5. Blushing Petals Crescent
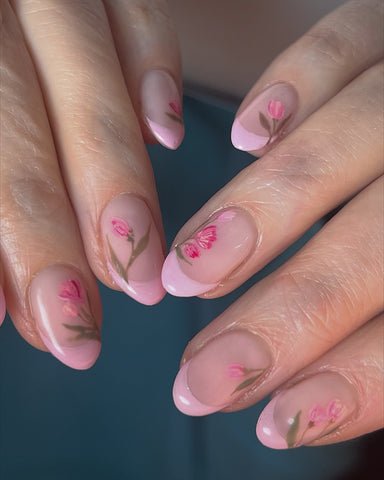
@freshsetlancaster (Instagram)
This nail design whispers romance with its translucent pink base and dainty rosebud motifs. Each nail is a canvas for the miniature art of blooming flowers, suggesting elegance and femininity.
Achieve this look at home:
- Apply a sheer pink polish on all nails for a subtle blush background.
- Using a fine brush, paint thin brown branches starting from the nail bed outwards.
- Add small green leaves at intervals along each branch with a detailing brush.
- Create rosebud shapes with darker pink polish at the tips of the branches.
- Use a lighter pink to add dimension to the rosebuds, then finish with a clear top coat for lasting wear.
Nail colors used:
- Sheer pink polish
- Brown polish for branches
- Green polish for leaves
- Dark and light pink polish for rosebuds

Supplies needed:
- Fine detailing brush
6. Botanical Winds
@nails_by.ry (Instagram)
The nail set is a playful meadow of white daisies against a clear backdrop, framed by a lively green French tip, evoking the spirit of spring.
Achieve this look at home:
- Paint a clear base coat on all nails.
- Apply a green polish in a curved line at the tip of each nail to create a French tip look.
- With a dotting tool, place small white dots in a circular pattern to form the daisy petals on each nail.
- Add a green dot in the center of each white petal cluster to complete the daisy.
- Seal with a clear top coat for durability and shine.
Nail colors used:
- Green polish for the tips and daisy centers
- White polish for daisy petals

Supplies needed:
- Dotting tool
7. Cherry Blossoms

@nails.miastudio (Instagram)
This nail art captures the essence of chic with its clear glossy base and vivid pink accents. Delicate cherry blossom designs grace the nails, creating a refined and feminine allure.
Achieve this look at home:
- Apply a clear base coat to all nails for a natural shine.
- Paint the tips with a bright pink polish, creating a subtle gradient effect.
- Using a fine brush, draw the branches of cherry blossoms with dark pink polish.
- For the blossoms, add small white dots with a dotting tool, forming a flower shape around the branches.
- Place a tiny pink dot in the center of each white blossom, and finish with a clear top coat for protection and gloss.
Nail colors used:
- Bright pink polish for tips and cherry blossom centers
- Dark pink polish for branches
- White polish for blossoms

Supplies needed:
- Fine brush
- Dotting tool
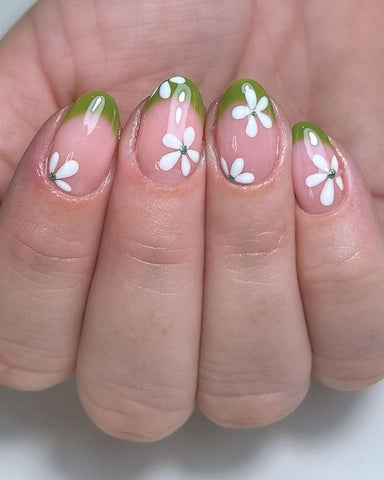
8. Daffodil Daydream

@gels_byash (Instagram)
This bright nail art ensemble boasts a sunny yellow hue, complemented by a charming floral design on a translucent base, embodying the joy and vibrancy of spring days.
Achieve this look at home:
- Paint all nails except for the ring fingers with a sunny yellow polish.
- Apply a clear polish on the ring fingers.
- Using a thin brush, paint green grass blades on the clear base of the ring fingers.
- Add simple yellow flowers above the greenery with a dotting tool or the brush's tip.
- Place a small white dot in the center of each flower and seal all designs with a clear top coat for shine and longevity.
Nail colors used:
- Sunny yellow polish
- Green polish for grass
- White polish for flower centers


Supplies needed:
- Thin brush for grass and petals
- Dotting tool for flowers and centers
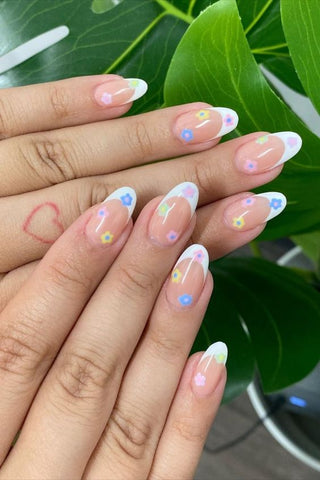
9. Dainty Skies
@elbebeauty (Instagram)
These nails exude a serene, pastel charm with a clear base, baby blue French tips, and a sprinkling of small, delicate daisies, perfect for a touch of spring on your fingertips.
Achieve this look at home:
- Apply a clear base coat to all nails for a transparent and glossy canvas.
- Paint a curved baby blue tip on each nail to create a soft French manicure effect.
- With a dotting tool, place small yellow dots to act as the centers of your daisies on each nail.
- Surround each yellow dot with small white dots to form the daisy petals.
- Seal your floral design with a clear top coat for durability and a shiny finish.
Nail colors used:
- Baby blue polish for French tips
- Yellow polish for daisy centers
- White polish for daisy petals
Supplies needed:
- Dotting tool
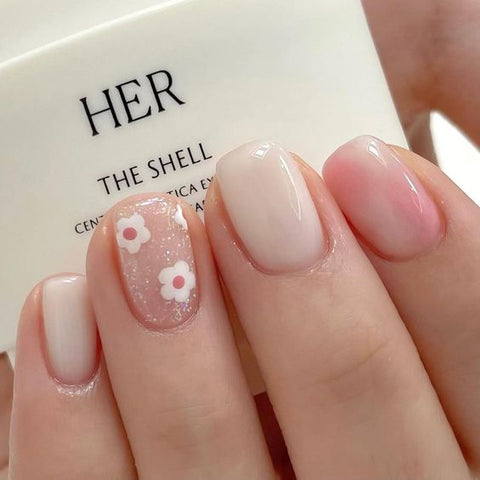
10. Dainty White Petals
@unninail (Instagram)
This delightful nail art presents a series of petite white daisies on a clear coat, creating a look of simplicity and innocence that's perfect for any casual, chic occasion.
Achieve this look at home:
- Begin with a sheer beige color on all nails for a natural, glossy backdrop.
- Use a white nail polish and a dotting tool to create five small dots in a circular pattern for the daisy petals.
- Add a smaller blue dot at the center of each daisy to complete the flower.
- Repeat the daisy pattern on each nail, placing them randomly or in a line for uniformity.
Nail colors used:
- Sheer beige polish for base
- White polish for daisy petals
- Blue polish for daisy centers

Supplies needed:
- Dotting tool
11. Daisy Dreams

@nailsbyheather.errington (Instagram)
This nail design features a sheer pink backdrop graced with white blossoms, each centered with a golden yellow dot, creating a serene floral tableau.
Achieve this look at home:
- Start with a sheer pink base color for all nails.
- Create white petals in a circular pattern using a fine brush.
- Place a yellow dot in the center of each white petal cluster.
- Add subtle white lines on the petals for a realistic flower effect.
Nail colors used:
- White for the petals
- Golden yellow for the centers

12. Dotty Blossoms
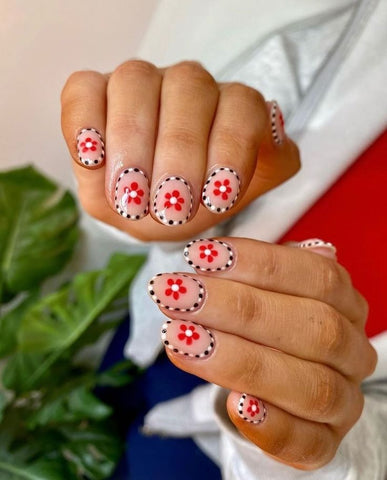
@thegelhouse (instagram)
This nail design showcases a playful polka-dot border framing vibrant red flowers, creating a whimsical and retro-inspired look.
Achieve this look at home:
- Start with a light pink base on all nails
- Paint a semi-circle at the base of each nail with red polish for the flower.
- Add white dots around the red semi-circle to form petals.
- Use black polish to create a dotted outline around the nail edge.
- Place a white dot in the center of each red semi-circle.
Nail colors used:
- Light pink for base
- Red for the semi-circular flower bases
- White for petals and flower centers
- Black for the border dots

Supplies needed:
- Dotting tool for dots and semi-circles
- Fine brush for precise black dot placement
13. Dreamy Pastel Checkers
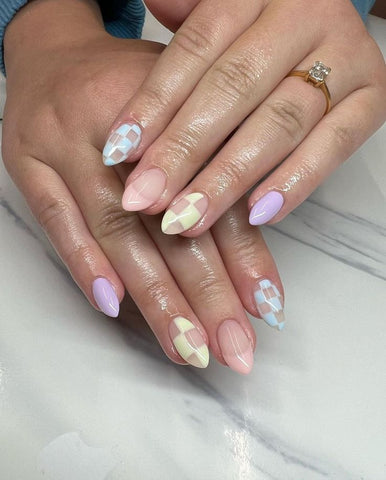
@lexi.loves.nails (Instagram)
Soft pastels and crisp white intertwine in geometric harmony, creating a tapestry of modern elegance across each nail.
Achieve this look at home:
- Apply a soft pink polish on the thumb, index, and pinky fingers.
- Use a pastel lavender polish on the middle finger and a pastel yellow on the ring finger.
- Place strips of nail tape in crisscross patterns over the nails.
- Paint white polish over the taped sections, and peel off the tape before the polish dries to reveal the geometric design.
Nail colors used:
- Soft pink polish
- Pastel lavender polish
- Pastel yellow polish
- White polish
Supplies needed:
- Nail tape for patterns
14. Florals and Bows
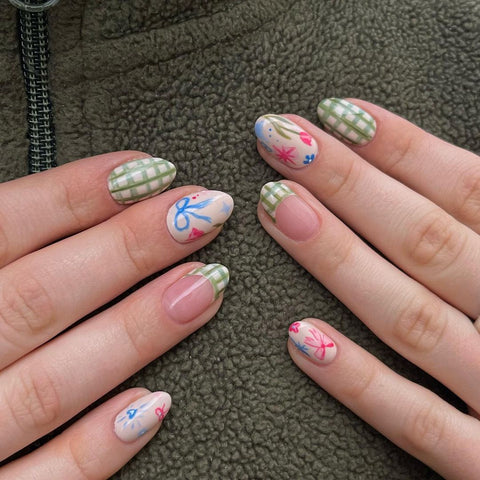
@nails_by.ry (Instagram)
Plaid patterns and delicate floral accents grace these nails, set against a sheer background, conjuring a picnic in a blooming garden.
Achieve this look at home:
- Paint a sheer nude base color on all nails.
- Create a plaid pattern with light green and white polish on the thumb, index, and pinky fingers.
- For the middle and ring fingers, draw floral designs with a fine brush using blue, pink, and green polish.
- Add a few small leaves with green polish to complement the flowers.
- For precision in the plaid and floral patterns, use a fine-tip brush.
Nail colors used:
- Sheer nude polish
- Light green polish
- White polish
- Blue polish
- Pink polish

Supplies needed:
- Fine-tip brush
15. Flower Jellies
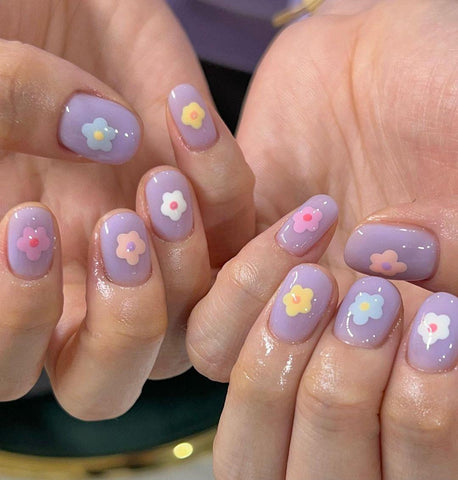
@lala_salon_nail (Instagram)
Dainty flowers in a pastel palette bloom on a lavender base, lending a touch of springtime whimsy to each nail.
Achieve this look at home:
- Paint your nails with a lavender polish as the base color.
- Once dry, add small flowers in pastel yellow, blue, and pink using a dotting tool.
- Place a small dot of white in the center of each flower for a pop of contrast.
- Use a light green polish to add tiny leaves to each flower for a complete floral effect.
- With a fine brush, define the petals and leaves to ensure each flower stands out.
Nail colors used:
- Lavender polish
- Pastel yellow polish
- Pastel blue polish
- Pastel pink polish
- White polish
- Light green polish


Supplies needed:
- Dotting tool
- Fine brush
17. Flower Power
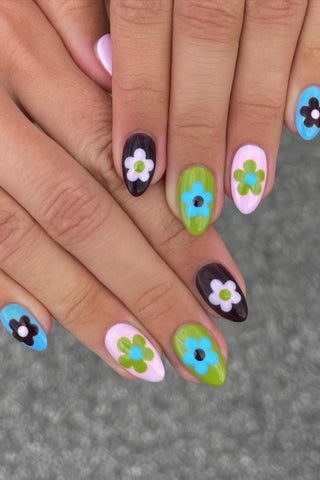
@peachinails (Instagram)
Vibrant flowers pop against a medley of pink, blue, green, and dark purple, giving a playful and colorful twist to the classic floral design.
Achieve this look at home:
- Paint alternating nails with pastel pink, sky blue, lime green, and dark purple as the base colors.
- Use white polish to paint one large flower on each nail, starting with five small dots in a circle for the petals.
- Dip a fine brush in black polish and add a dot in the center of each white flower.
- Add accent dots around the flowers in contrasting colors, like blue on pink and green on purple.
- Refine the petals with a fine brush to make sure each flower is distinct.
Nail colors used:
- Pastel pink polish
- Sky blue polish
- Lime green polish
- Dark purple polish
- White polish
- Black polish
Supplies needed:
- Fine brush
- Dotting tool
18. Fragmented Sunshine
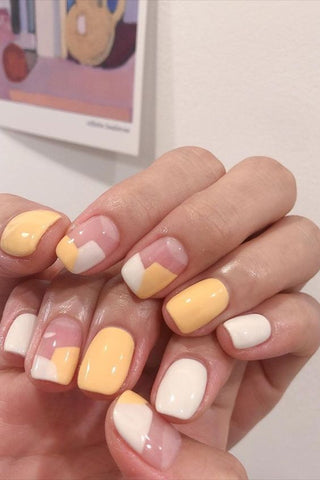
@unninail (Instagram)
Sunshine yellow and creamy white alternate in a charming color-block pattern, reminiscent of a sunny day with fluffy clouds.
Achieve this look at home:
- Paint half of your nails with a sunshine yellow polish and the other half with a creamy white polish as the base colors.
- Once dry, tape off a diagonal section on each nail.
- Apply the opposite color over the taped area, creating a color-block effect.
- Carefully remove the tape while the polish is still slightly wet to ensure crisp lines.
- Use a small brush to correct any imperfections and sharpen the edges of the color blocks.
Nail colors used:
- Sunshine yellow polish
- Creamy white polish
Supplies needed:
- Nail tape
- Small brush
19. Fresh Spring blooms
@thepolishedbotanist (Instagram)
Olive green serves as a lush backdrop for delicate white daisies, each centered with a golden dot, evoking a meadow at dusk.
Achieve this look at home:
- Apply an olive green polish as the base color on all nails.
- Using a small brush, paint white petals to form daisies on each nail, with each flower consisting of five small strokes.
- Dot the center of each daisy with yellow polish to mimic the look of pollen.
- Scatter the daisies across the nails, varying the position for a natural look.
- Use the fine tip of a brush to touch up any smudges around the petals for a clean finish.
Nail colors used:
- Olive green polish
- White polish
- Yellow polish
Supplies needed:
- Small brush
- Dotting tool or the rounded end of a pin
20. Gentle Spring Bloom
@gels_byash (Instagram)
A blushing pink base blooms with clusters of tiny white flowers, creating a delicate and feminine floral pattern.
Achieve this look at home:
- Coat your nails with a blush pink polish as the base color.
- On the accent nails, apply a sheer pink polish to create a see-through effect.
- Use a fine brush to paint small clusters of white flowers, adding four to five dots to form each petal.
- Place a pale yellow dot in the center of each flower for a touch of color.
- Apply small white dots around the flowers to enhance the dainty floral motif.
Nail colors used:
- Blush pink polish
- Sheer pink polish
- White polish
- Pale yellow polish
Supplies needed:
- Fine brush
- Dotting tool
21. Gilded Flora Chic
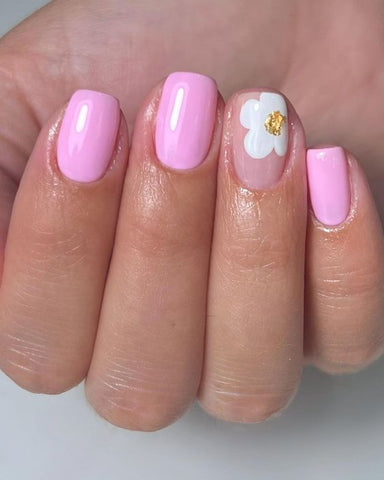
@elbebeauty (Instagram)
Candy pink polish sets the stage for a playful rendezvous of simple white petals, while a single gold flake adds a touch of luxe on one nail.
Achieve this look at home:
- Coat all your nails with a candy pink polish as the base color.
- On all but one nail, use a dotting tool to paint small clusters of white petals near the cuticle or edges.
- Select one nail to feature a single white petal.
- Apply a small gold leaf flake or a dot of gold polish to the center of the single petal for a gilded effect.
- Use a fine brush to define the white petals, ensuring each one is visible and crisp against the pink background.
Nail colors used:
- Candy pink polish
- White polish
- Gold polish (or gold leaf flake)
Supplies needed:
- Dotting tool
- Fine brush
- Gold leaf flake (optional, if not using gold polish)
22. Glossy Baby Flowers

@lala_salon_nail (Instagram)
Cheerful pastel flowers dot each nail, their petite blossoms set against a transparent polish for a look of fresh spring innocence.
Achieve this look at home:
- Start with a clear polish on all nails for a natural, glossy base.
- Paint small flowers in pastel shades of pink, yellow, and blue with a dotting tool, placing one on each nail.
- Add a tiny white dot in the center of each flower to bring the blooms to life.
- Strategically position the flowers near the base or slightly off-center for an unstudied charm.
- Use a fine brush to add delicate white accents to the petals, enhancing their shape.
Nail colors used:
- Pastel pink polish
- Pastel yellow polish
- Pastel blue polish
- White polish
Supplies needed:
- Dotting tool
- Fine brush
23. Lavender Dreams

@gels_byash (Instagram)
Lavender fields come to mind with this charming design, featuring small white daisies with sunny yellow centers scattered across a soft purple base.
Achieve this look at home:
- Paint all nails with a lavender polish as the base color.
- Once dry, use a dotting tool to add small white petals around a central point to create daisies on each nail.
- Apply a small dot of yellow polish in the center of each daisy.
- Space the daisies evenly, allowing each one some room to stand out.
- With a fine brush, add tiny white dots around the daisies for extra detail and fullness.
Nail colors used:
- Lavender polish
- White polish
- Yellow polish
Supplies needed:
- Dotting tool
- Fine brush
24. Lilac Floral Breeze

@nailalamode (Instagram)
Whispers of spring emanate from this nail design, where simple white daisies accent a mix of sheer and lavender polish.
Achieve this look at home:
- Paint the thumb, index, and pinky fingers with a sheer polish and the middle and ring fingers with lavender polish as the base colors.
- Use a dotting tool to create small white daisy designs on the sheer polished nails.
- Add a single white dot in the center of each daisy.
- Distribute the daisies randomly, focusing on the base or tip for an organic feel.
- With a fine brush, detail the petals on each daisy, ensuring they are distinct and well-shaped.
Nail colors used:
- Sheer polish
- Lavender polish
- White polish
Supplies needed:
- Dotting tool
- Fine brush
25. Lilac Garden Fantasy
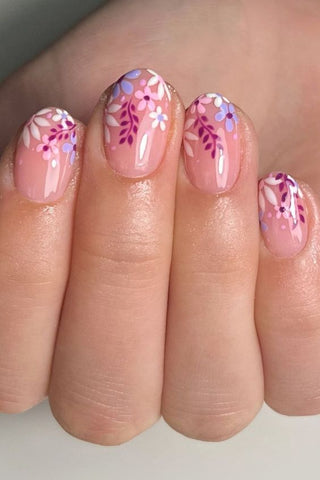
@elbebeauty (Instagram)
Elegant branches laden with blossoms in shades of pink and purple dance across a translucent pink canvas, creating an ethereal floral display.
Achieve this look at home:
- Apply a translucent pink polish on all nails for a blush-tinted base.
- Paint fine branches in a dark purple hue sweeping across each nail.
- Adorn the branches with small pink and purple flowers using a dotting tool.
- Add white accents to the flowers to give them depth and dimension.
- Place tiny white dots along the branches to represent buds and enhance the floral motif.
Nail colors used:
- Translucent pink polish
- Dark purple polish
- Pink polish
- White polish
Supplies needed:
- Dotting tool
- Fine brush
26. Lilac Waves
@heluviee (Instagram)
This sleek design showcases a subtle gradient from a pink nude to a soft lilac, exuding sophistication with a modern twist.
Achieve this look at home:
- Apply a pink nude polish on all nails as the base color.
- Once the base is dry, sponge on a soft lilac polish at the tips, blending towards the middle to create a gradient effect.
- Use a fine brush to smooth out the transition between the two polishes.
- Repeat the sponging process if necessary to intensify the lilac at the tips.
- Finish by refining the gradient with the brush to ensure a seamless blend.
Nail colors used:
- Pink nude polish
- Soft lilac polish
Supplies needed:
- Makeup sponge
- Fine brush
27. Matcha Petals

@nailbyliapp (Instagram)
A playful contrast of olive green and soft pink, with the latter adorned in white floral patterns, offers a fresh take on springtime motifs.
Achieve this look at home:
- Paint the thumb, index, and pinky fingers with an olive green polish as the base color.
- Apply a soft pink polish on the middle and ring fingers.
- Once the pink polish is dry, use a fine brush to create white floral patterns.
- Add small green dots to the center of the flowers for a hint of color continuity.
- Use the fine brush to create the illusion of petals on the white flowers for a detailed finish.
Nail colors used:
- Olive green polish
- Soft pink polish
- White polish
Supplies needed:
- Fine brush
- Dotting tool
28. Milk and Honey Blossom

@unninail (Instagram)
Creamy off-white nails serve as a canvas for delicate white flowers, with subtle gold accents that add a touch of refined elegance.
Achieve this look at home:
- Paint all nails with an off-white polish as the base color.
- On selective nails, use a fine brush to paint white petals forming small flowers.
- Place a tiny gold foil or a dot of gold polish in the center of each flower for a touch of sparkle.
- On a couple of nails, add a swoosh of gold for an abstract, artistic feel.
- With the fine brush, detail the petals for precision and add thin gold lines to highlight the design.
Nail colors used:
- Off-white polish
- White polish
- Gold polish or gold foil
Supplies needed:
- Fine brush
- Gold foil (optional, if not using gold polish)
29. Milk Blossoms
@nail_friendlyyy (Instagram)
Soft blush gradients embrace the nails, providing a delicate canvas for tiny white daisies, creating a vision of understated elegance.
Achieve this look at home:
- Begin with a transparent pink base on all nails for a glossy, natural blush.
- Use a sponge to lightly dab on a white gradient at the tips, blending into the pink base.
- With a dotting tool, create small white daisies on one or two accent nails.
- Place a tiny yellow dot in the center of each daisy for a dash of color.
- Finish by adding subtle white details to the petals for a refined and polished floral pattern.
Nail colors used:
- Transparent pink polish
- White polish
- Yellow polish
Supplies needed:
- Sponge
- Dotting tool
- Fine brush
Milky Blue French Tips
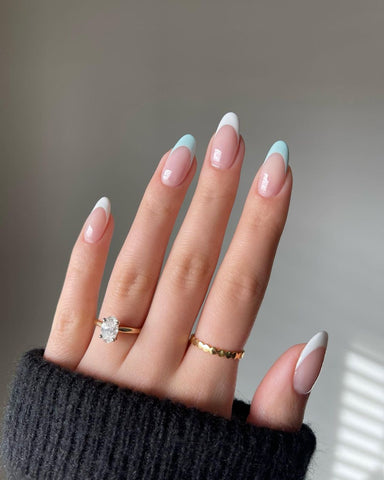
@heluviee (Instagram)
The elegance of this design is in its simplicity: a creamy nude base tipped with a whisper of soft sky blue, offering a modern take on the French manicure.
Achieve this look at home:
- Apply a nude polish across the entire nail as the base color.
- Once the base is dry, carefully paint the tips with a sky blue polish, following the natural curve of your nail for that classic French tip shape.
- For a sharper edge, use thin nail tape as a guide for the blue polish.
- Gently remove the tape to reveal your pristine blue tips.
- If needed, touch up any imperfections with a fine brush dipped in nude polish.
Nail colors used:
- Nude polish
- Sky blue polish
Supplies needed:
- Nail tape
- Fine brush
30. Misty Spring Bloom
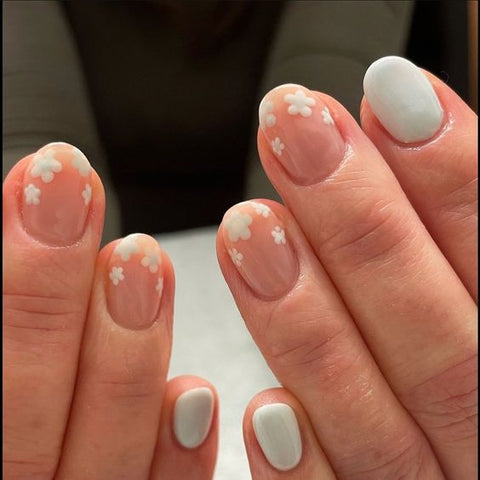
@gels_byash (instagram)
This design is a soft embrace of spring, featuring a sheer pink polish adorned with delicate white flowers, paired with solid white on alternating nails for a serene look.
Achieve this look at home:
- Coat the thumb, middle, and pinky fingers with a sheer pink polish for a natural base.
- Paint the index and ring fingers with a solid white polish.
- Once the sheer polish is dry, use a dotting tool to add small white flowers.
- Create the flowers by dotting five small petals in a circular pattern.
- Place a single dot in the center of each flower to finish the look.
Nail colors used:
- Sheer pink polish
- White polish
Supplies needed:
- Dotting tool